How to take photos of the auroras
Plenty of people have seen great photos of the auroras, but how do you take a great photo of them?
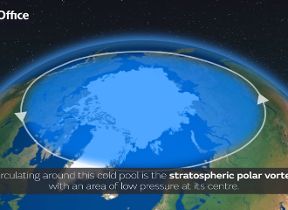
Auroras – best known in the northern hemisphere as the aurora borealis – are amongst the most dramatic and engaging sights of the natural world. For millennia they have been considered a sign from the gods or a precursor of key events of human significance. Today we can explain the origins or auroras, and even predict them, through science and careful observation.
Photographers tried to capture the shifting light and patterns of auroras right from photography’s announcement in 1839. The long exposures and technical difficulties of early photography meant that it was not until 1892 that the first successful photograph of the aurora borealis from Norway was made – in black and white, of course. For the same technical reasons, it took until 1950 until the first colour photographs were made. Since then, photography has been key in helping scientists understand and document the various types of auroras.
Photography
The Royal Photographic Society are experts in photography and have brought together the best advice on photography for the auroras below.
Today, almost anyone armed with a smartphone or digital camera can make a picture of auroras. Auroras vary in intensity, patterns, movement, and colour ranging from magentas and purples, although green is the most common. It helps to have a camera you can control, and the ability to do a little post-processing of your digital file which can enhance what you have captured.
For the best results there are some tips that will help you get the most from your camera and once you have mastered photographing auroras you can start to experiment about where you photograph from and what you include in your photograph to create a truly stunning picture.
Top aurora photography tips
- Pre-check 1. Check the Met Office Space Weather forecast that will tell you where and when you are likely to observe an aurora. This will give you early warning of activity so you can prepare and travel to your location. Check for the KP Index which is on a scale of 0-9. The higher the number the better the chance of seeing an aurora display, subject, of course, to Earth’s cloud cover.
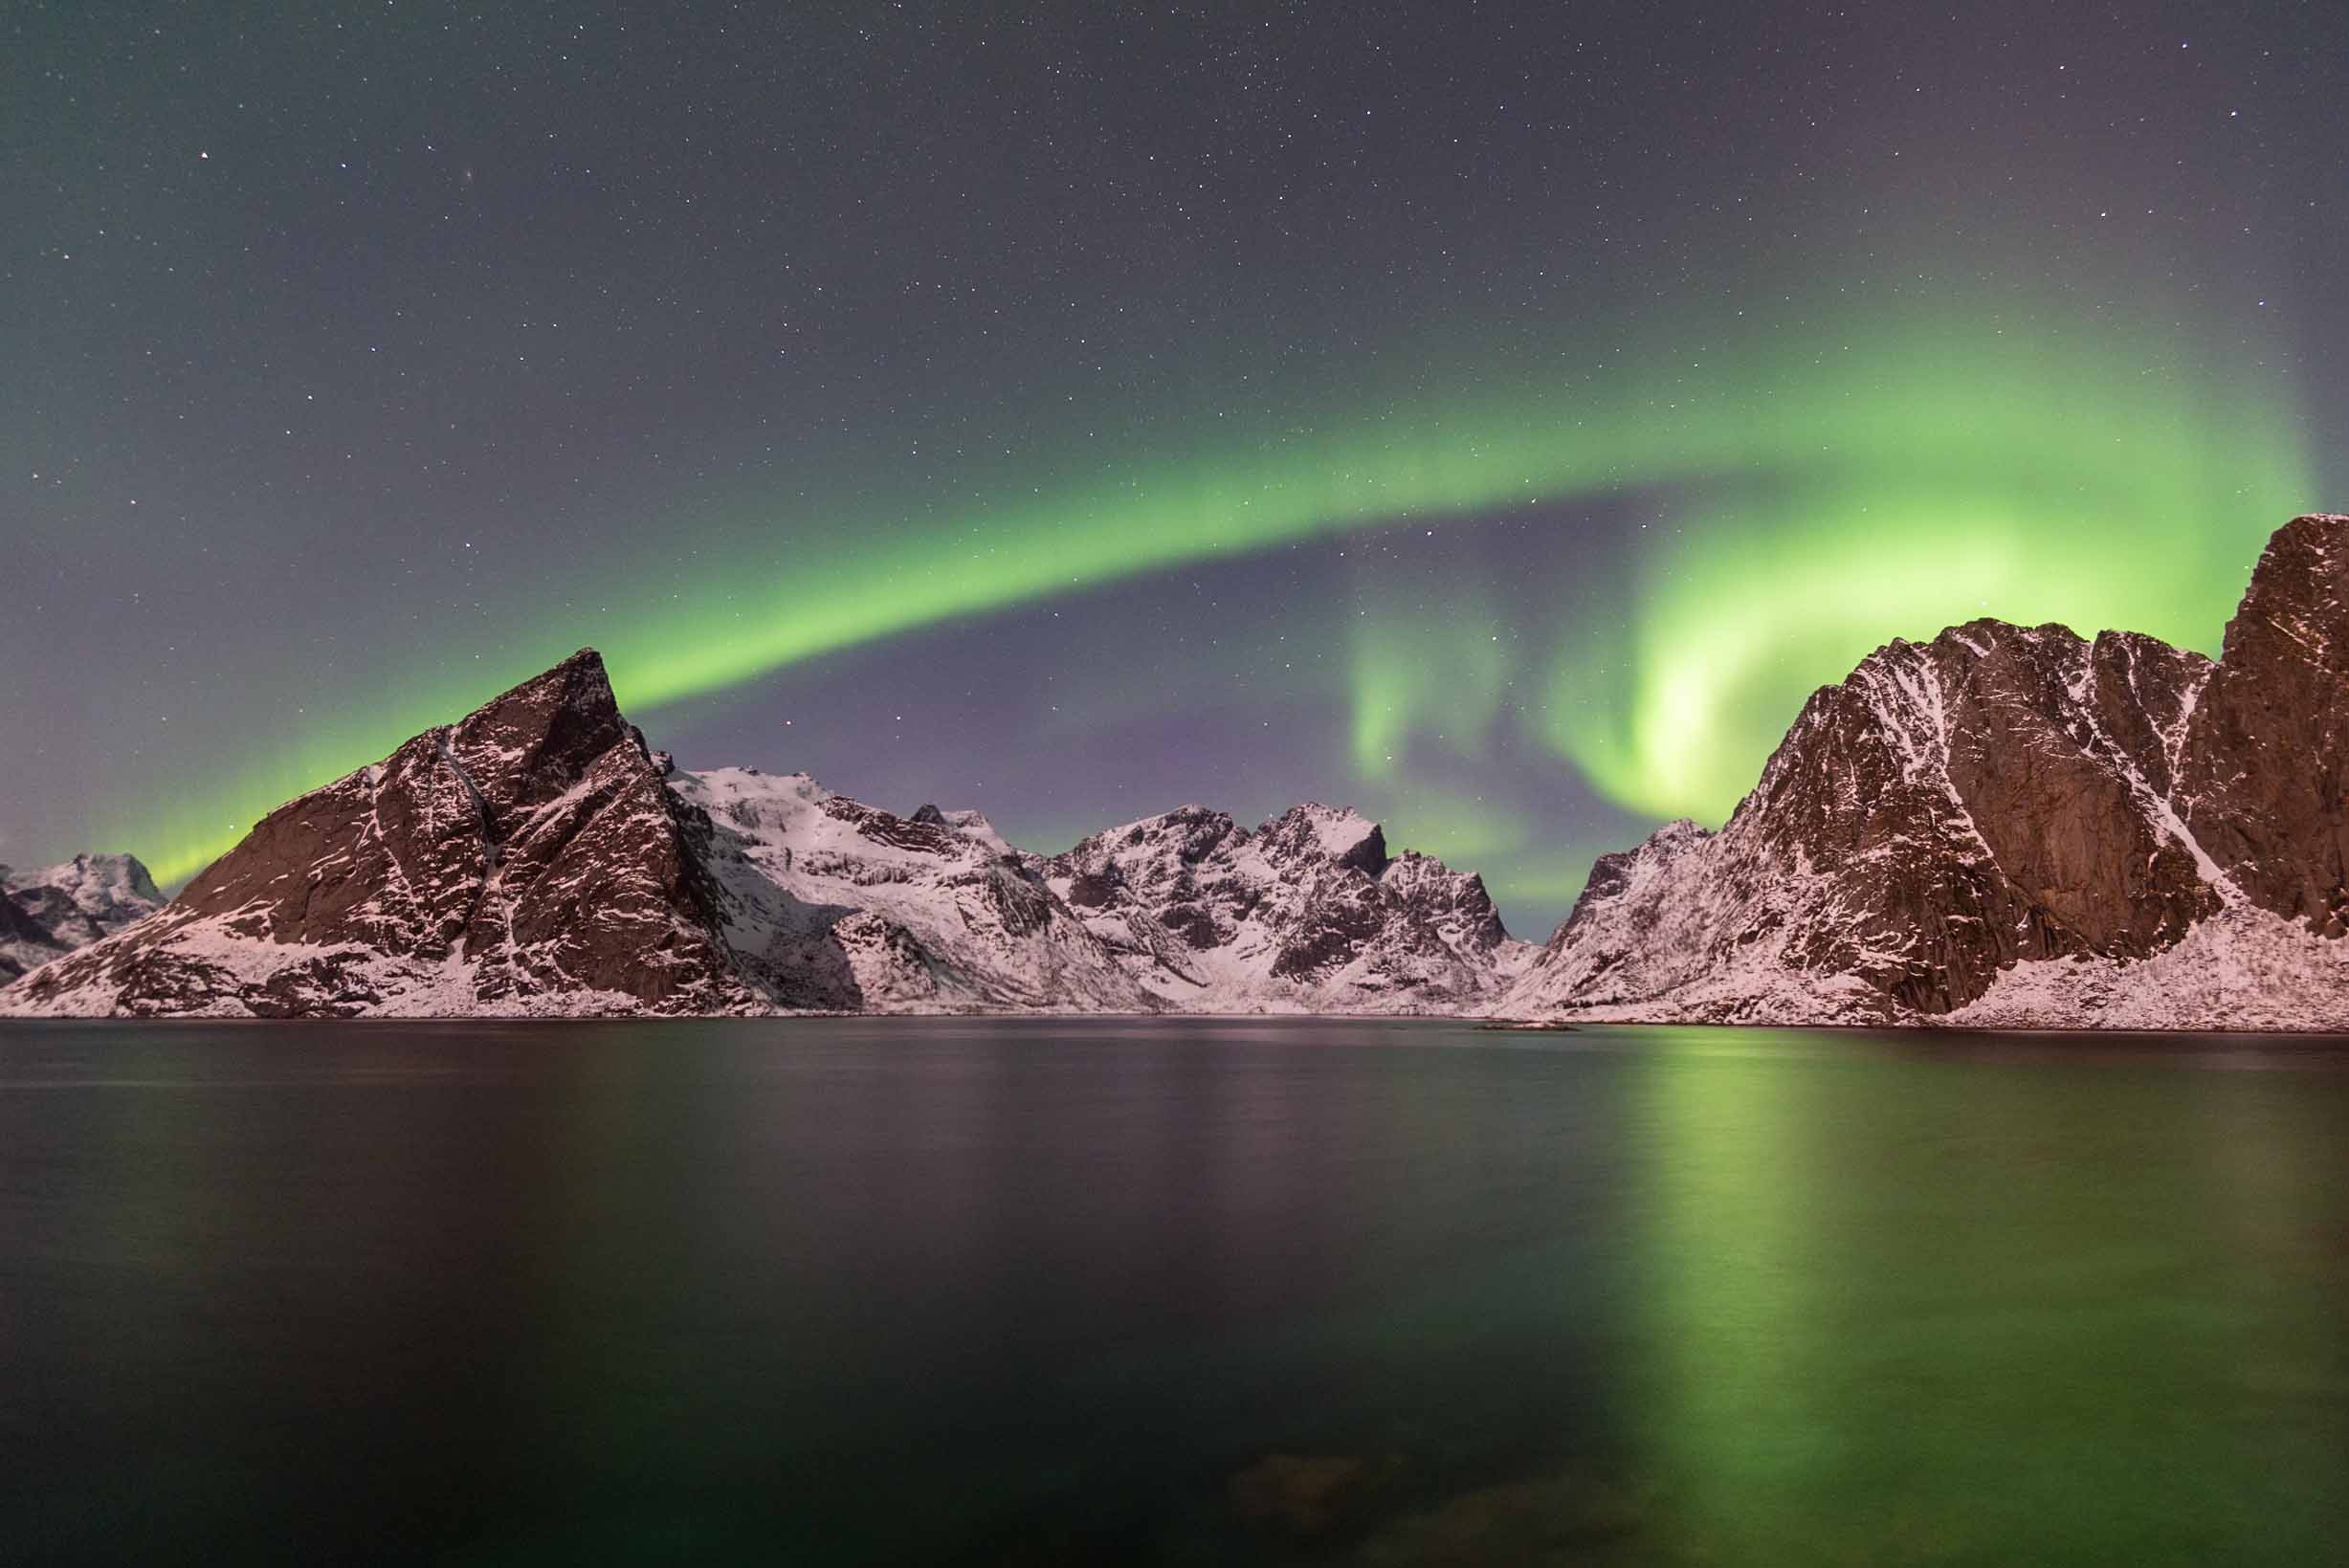
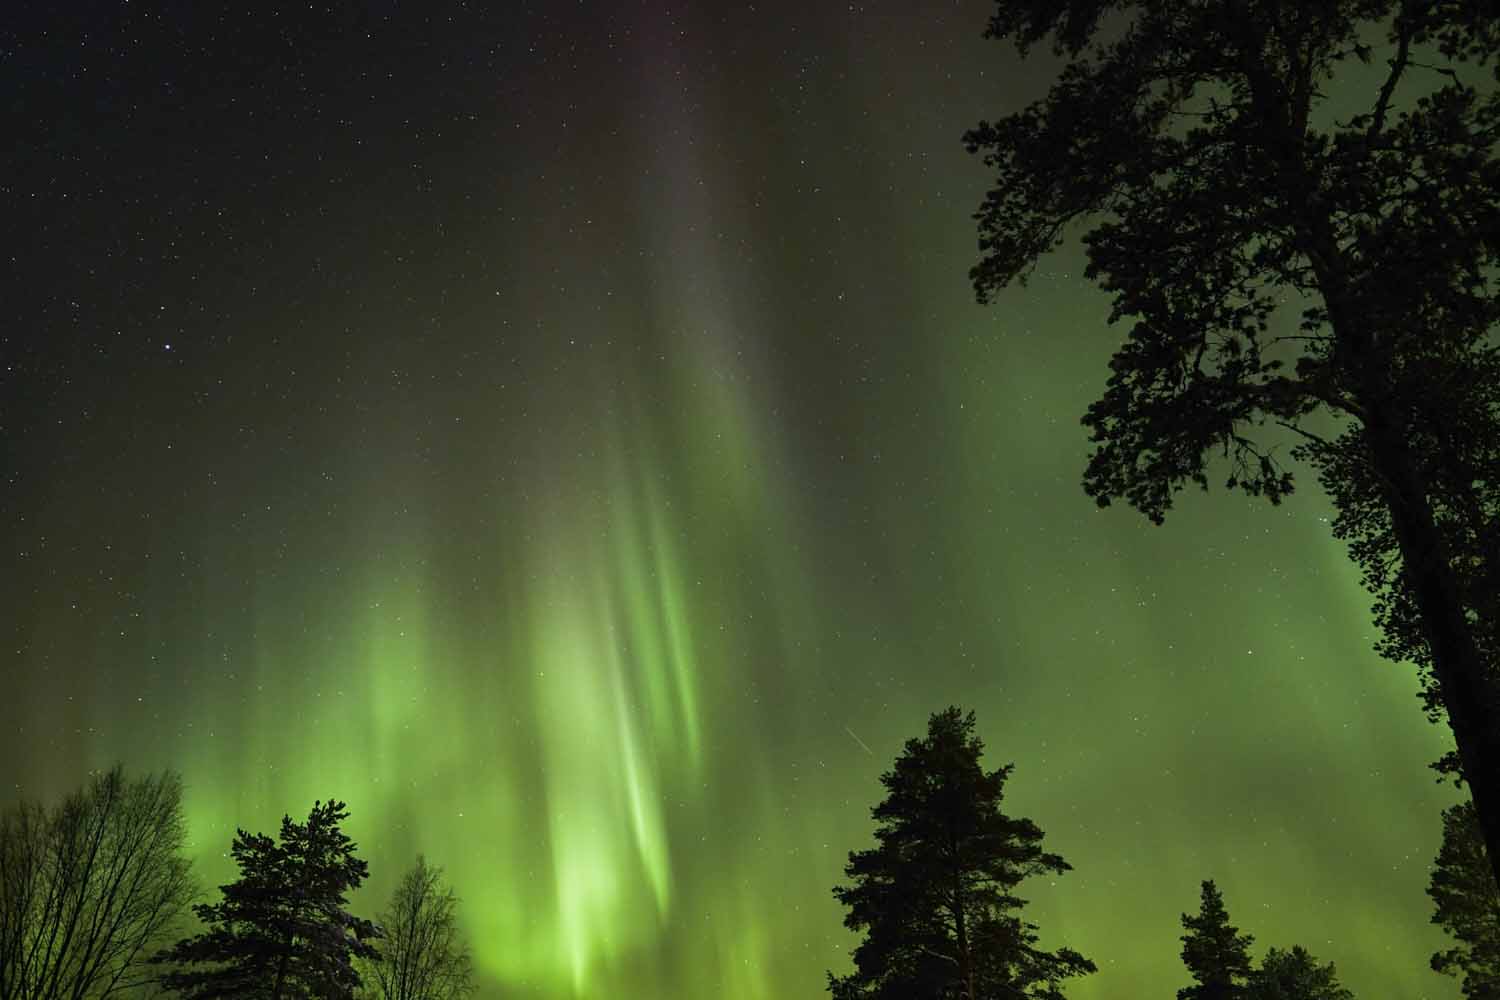
- Pre-check 2. Aim for a clear sky with no wind, and find a ‘dark skies’ location with low light pollution. Look for an interesting foreground, such a trees, which will create silhouettes in to the sky. Or use a lake or water, which will create reflections and make for a more interesting picture. In time, you can experiment with adding light from a strobe or LED lamp to bring out detail into the foreground.
- Basic equipment. Make sure your camera or smartphone is mounted on a tripod which you can adjust so the camera can point upwards into the sky. Start with a wide-angle lens (35mm to 14mm on a full-frame camera) to get as much of the sky as possible. A remote shutter release (or use the camera’s self-timer) will stop any movement when you make your exposure.
- Comfort. It’s usually cold outside, so make sure you’re wrapped up warm for what may be an extended time outdoors. Take a flask of hot tea. Don’t forget that if you are moving your camera and lenses from the warmth indoors to cold air then let it acclimatise so any condensation has gone. Avoiding breathing on your camera – it may freeze or take a long time to dissipate. Pre-set your camera and lenses as much as you can so your fingers don’t get too cold. Batteries can lose power in the cold so take spares with you and keep them warm in your pockets. You may find a small headtorch helpful in the dark.
- Camera settings. Set your camera’s white balance to 3500k for the most natural and consistent results. Use your camera’s RAW file setting if it has it and set the focus manually to infinity. You will always need to experiment with exposure, but as a starting point, try setting your camera’s ISO to 1600 or 3200, an aperture of f/2.8 or f/4 and try a shutter speed of 8 to 15 seconds, depending on the brightness of the auroras. If it is moving very quickly you’ll need a faster shutter speed, perhaps down to 1-3 seconds. Aim to capture as much light with the shortest exposure you can. You’ll probably find that your camera sensor will capture more than you can see. Any moonlight or ambient light will allow you to reduce your exposure.
- Outdoors. Make the most of the aurora and take as many exposures as you can at different settings, and from different locations before you and your camera get too cold and head back indoors.
- Afterwards. You may be happy with the images you have captured which is great. They may benefit from a little post-processing and having shot RAW will help with this, although JPG will still allow you to make some adjustments. You can reduce any digital noise from the low light and high ISO, and you can adjust levels or contrast to enhance what you have seen. Don’t over do this or your pictures will look false.
- Next time – experiment. Once you have got the basics then start to experiment with backgrounds, reflections or supplementary light to add detail to your picture’s foreground. Try adding people in silhouette, or slightly lit, to give scale. Some ambient light from a street lamp, cars, building or city, may add something, but don’t overdo it, as auroras can’t always compete and you’ll degrade their impact. Get creative and experiment. Even though no two auroras are the same you should try and make your own pictures distinctive.
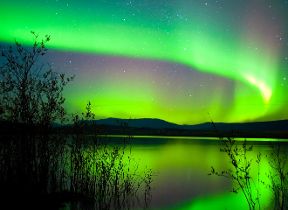
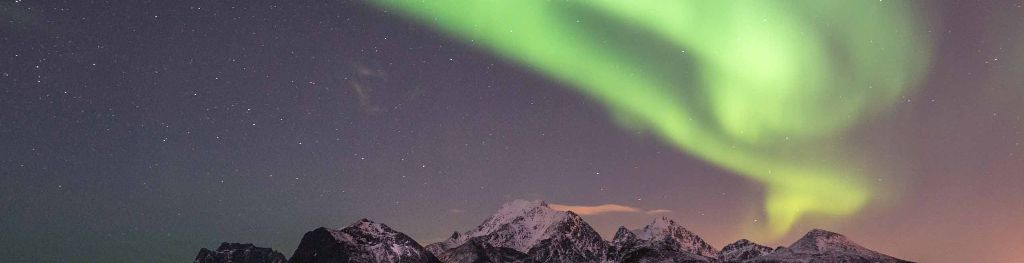
The accompanying pictures are by members of the Royal Photographic Society (RPS), Grahame Soden ARPS and Richard Ellis ARPS.
The RPS is a charity which aims to bring photography to everyone. Membership is open to anyone with an interest in photography. www.rps.org
Written by Dr Michael Pritchard FRPS. Michael is the RPS’s director of programmes, a photographic historian and a photographer. E: [email protected]